Table of Contents
This document is a tutorial to describe basic usage of Authlete APIs in order to implement OpenID Connect (OIDC) identity provider (IdP) server that supports the authorization code flow.
In completing the tutorial, you will
In a typical Authlete implementation, the authorization server middleware would be responsible for passing requests to and handling responses from the Authlete API. In this tutorial, you will make these requests directly with the bash/zsh curl command. You may of course use an alternate HTTP client of your choice (PowerShell, Postman, etc.), but you’ll need to know how to adapt the instructions for yourself in this instance.
To understand how each piece fits together in this OAuth flow, we’ve provided a list of fully qualified domain names (FQDN) for each component. The FQDNs for the authorization server and the client are invented only for reference, and would of course be substituted for real ones in a real implementation.
| Component | FQDN |
|---|---|
| Authlete API US Cluster | us.authlete.com |
| Authlete Management Console | console.authlete.com |
| Authorization Server | as.example.com |
| Client | client.example.org |
| Resource Server | N/A |
Consult instructions “Sign-up to Authlete and Creating a Service“ for how to create an Authlete API service and register a client to the service.
Take care to note your Service ID, Service Access Token, and Client Secret values.
If you’ve already completed other Authlete tutorials, you can reuse your existing service. Otherwise use the following values to create your service, leaving all other fields as default:
| Field | Value |
|---|---|
| API Cluster | 🇺🇸 US |
| Service Name | Demo AS |
| Service Description | Example authorization service |
You can use the following values to create your client, leaving all other fields as default:
| Field | Value |
|---|---|
| Client Name | Demo OIDC Client |
| Client Description | Example client for OIDC tutorial |
| Client Type | CONFIDENTIAL |

Once your client is created, go to Client Settings > Endpoints > Global Settings. In the Redirect URIs section, click Add to enter and save the URI where the client will receive authorization responses.
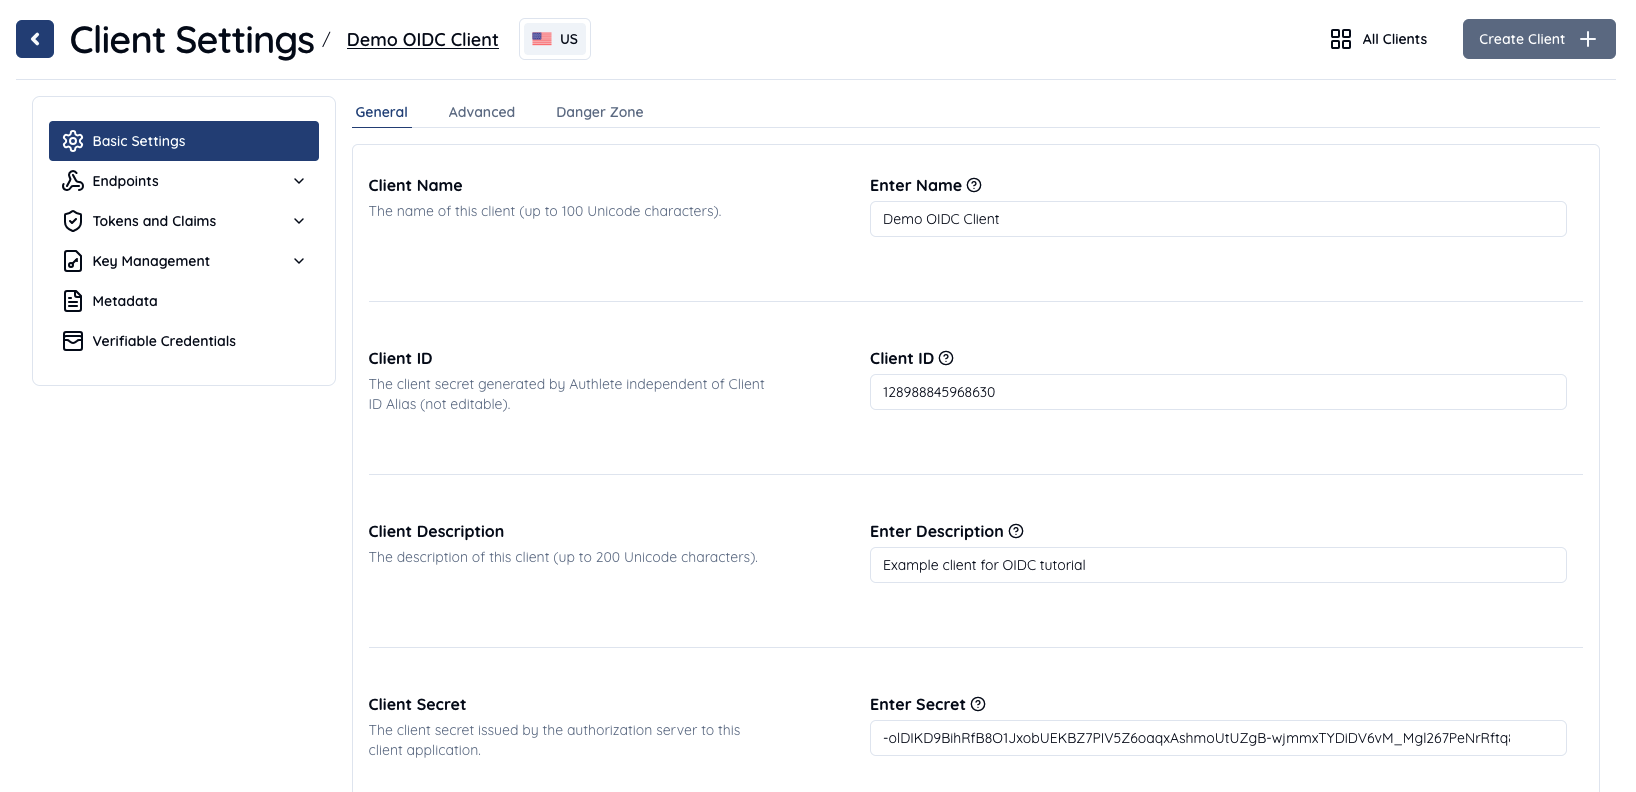
The following example properties are generated or specified when you create a client. These are values required when making requests as part of the code flow that you will complete. Use the values you noted down in the environment setup section.
| Item | Value |
|---|---|
| Service ID | Auto-generated e.g. 10738933707579 |
| Service Access Token | Auto-generated e.g. Xg6jVpJCvsaXvy2ks8R5WzjdMYlvQqOym3slDX0wNhQ |
| Client ID | Auto-generated e.g. 12898884596863 |
| Client Secret | Auto-generated e.g. -olDIKD9BihRfB8O1JxobUEKBZ7PIV5Z6oaqxAshmoUtUZgB-wjmmxTYDiDV6vM_Mgl267PeNrRftq8cWplvmg |
| Client Type | CONFIDENTIAL |
| Redirect URIs | https://client.example.org/cb/example.com |
| Client Authentication Method | CLIENT_SECRET_BASIC |
Now, let’s try the OIDC authorization code flow using this environment.
We’ve provided the following sequence diagram to help you understand each of the steps involved in the code flow. You can identify where you are at in the walk-through using the numbers which correspond to specific steps in the diagram.
We’ll use the following values as example parameters for the request (as specified previously).
| Item | Value | Description |
|---|---|---|
| client_id | 12898884596863 |
Registered client ID |
| response_type | code |
A value stating OIDC authorization code flow (when scope contains openid) |
| redirect_uri | https://client.example.org/cb/example.com |
One of registered redirect URIs |
| scope | openid |
A value stating this request is OIDC authentication request |
| nonce | n-0S6_WzA2Mj |
Nonce value (See 3.1.2.1. Authentication Request - OpenID Connect Core 1.0) |
When the resource owner attempts to access a protected resource through the client (steps #1, #2) the client makes an OIDC authentication request (authorization request) to the authorization server via user agent (steps #3, #4).
The authorization server receives the above data here shown as the HTTP GET query string from the user agent.
redirect_uri=https://client.example.org/cb/example.com
 &response_type=code
 &client_id=12898884596863
 &scope=openid
 &nonce=n-0S6_WzA2Mj
The job of the authorization server is to evaluate these parameters. Here are some typical evaluation rules:
12898884596863 has been registered to the authorization server. It must be an OIDC relying party because of scope=openid.https://client.example.org/cb/example.com matches with one of URIs registered to the clientresponse_type, scope are applicable for the client, i.e. permitted for the client to specify in its requestAfter that, the authorization server would process the OIDC authorization code flow since the values of scope and response_type are openid and code respectively.
However, in the Authlete architecture the authorization server is simply a proxy for the actual authorization logic contained in the Authlete API which is surfaced at the /auth/authorization endpoint. Once received, the Authlete API does the evaluation process on the authorization server’s behalf.
You’ll now simulate the authorization server’s request to this API.
Execute the curl command as follows (message #5). Make sure to replace <Service ID>, <Service Access Token> and <Client ID> by your own values generated in the previous step.
curl -s -X POST https://us.authlete.com/api/<Service ID e.g. 10738933707579>/auth/authorization \
-H 'Authorization: Bearer <Service Access Token e.g. Xg6jVpJCvsaXvy2ks8R5WzjdMYlvQqOym3slDX0wNhQ>' \
-H 'Content-Type: application/json' \
-d '{ "parameters": "redirect_uri=https://client.example.org/cb/example.com&response_type=code&client_id=<Client ID e.g. 12898884596863>&scope=openid&nonce=n-0S6_WzA2Mj" }'
If successful, Authlete will reply with the following response (shortened for brevity) (message #6).
{
   "resultMessage" : "[A004001] Authlete has successfully issued a ticket to the service (API Key = 10738933707579) for the authorization request from the client (ID = 12898884596863). [response_type=code, openid=true]",
   "resultCode" : "A004001",
   "client" : { [...] },
   "ticket" : "bi2Kxe2WW5mK_GZ_fDFOpK1bnY6xTy40Ap_8nxf-7AU",
   "action" : "INTERACTION",
   [...]
   "service" : {
      [...]
      "supportedClaims" : null,
      "supportedScopes" : null,
   }
}
Pay attention to the three key/value pairs in the response; resultMessage, action and ticket as seen above.
resultMessage provides a human-readable result of the request processing (See also Interpreting Authlete’s result codes). openid=true indicates the request is to be processed in accordance with the OIDC protocol.action indicates what the authorization server should do next.ticket is required for the authorization server to make a request to another API in the next step.Authlete also provides service and client information in the response. The authorization server uses them to ask the resource owner if he or she authorizes access for the client to the service.
Actual interaction between the resource owner and the authorization server is out of scope in this tutorial. In most cases, authorization server would authenticate user with some credentials (e.g. ID/password), determine roles and privileges for the user, and ask the user if he or she authorizes to share the authentication result with the client (steps #7, #8, #9).
Let’s assume the authorization server reaches the following state after completion of the previous process:
subject parameter, is testuser01.The authorization server makes a request to Authlete’s /auth/authorization/issue in order to issue an authorization code. It specifies values of subject and ticket that were a part of the response from /auth/authorization API, as request parameters.
Execute the following curl command (message #10), making sure to replace <Service ID>, <Service Access Token> and <Ticket> by your own values generated in the previous step.
curl -s -X POST https://us.authlete.com/api/<Service ID e.g. 10738933707579>/auth/authorization/issue \
-H 'Authorization: Bearer <Service Access Token e.g. Xg6jVpJCvsaXvy2ks8R5WzjdMYlvQqOym3slDX0wNhQ>' \
-H 'Content-Type: application/json' \
-d '{ "ticket": "<Ticket e.g. bi2Kxe2WW5mK_GZ_fDFOpK1bnY6xTy40Ap_8nxf-7AU>", "subject": "testuser01" }'
If successful, Authlete will reply with the following response (step #11).
{
   "action" : "LOCATION",
   "resultCode" : "A040001",
   "accessTokenDuration" : 0,
   "accessTokenExpiresAt" : 0,
   "resultMessage" : "[A040001] The authorization request was processed successfully.",
   "responseContent" : "https://client.example.org/cb/example.com?code=GrYz5vtk6VaF0jxfnDrB2yvmk4deIrnMkrGT07JdM5U",
   "authorizationCode" : "GrYz5vtk6VaF0jxfnDrB2yvmk4deIrnMkrGT07JdM5U",
   ...
}
Pay attention to three key/value pairs in the response; resultMessage, action and responseContent.
resultMessage provides a human-readable result of the request processing. (See also Interpreting Authlete’s result codes)action indicates what the authorization server should do next. The value in this response is LOCATION, which means the authorization server should make a redirection response back to the user agent.responseContent is the content of the response from the authorization server.The authorization server is expected to make the following response (new line for readability) to the user agent (step #12).
HTTP/1.1 302 Found
Location: https://client.example.org/cb/example.com
 ?code=GrYz5vtk6VaF0jxfnDrB2yvmk4deIrnMkrGT07JdM5U
Alternatively, the authorization server may fail to receive authorization. In this instance, it won’t issue tokens to the client. In that situation the authorization server would notify the client that the authorization flow is terminated. Authlete’s /auth/authorization/fail API supports the termination process in terms of messages to be sent to the client, and transfer method for the response.
To summarize, under most circumstances, the authentication server sends a request to either /auth/authorization/issue or /auth/authorization/fail API depending on the result of user authentication and consent.
Here we assume that the user agent receives the redirection response form the authorization server. It would send the following request (new line for readability) to the client (step #13).
GET /cb/example.com?code=GrYz5vtk6VaF0jxfnDrB2yvmk4deIrnMkrGT07JdM5U HTTP/1.1
Host: client.example.org
The client needs to extract the value of the code parameter, construct a token request using its value and send it to the authorization server as follows (new lines for readability). https://as.example.com/token is the token endpoint URI in this tutorial (step #14).
POST /token HTTP/1.1
Host: as.example.com
Authorization: Basic base64(12898884596863:-olDIKD9BihRfB8O1JxobUEKBZ7PIV5Z6oaqxAshmoUtUZgB-wjmmxTYDiDV6vM_Mgl267PeNrRftq8cWplvmg)
Content-Type: application/x-www-form-urlencoded

grant_type=authorization_code
 &code=GrYz5vtk6VaF0jxfnDrB2yvmk4deIrnMkrGT07JdM5U
 &redirect_uri=https://client.example.org/cb/example.com
Once again, the authorization server passes the request on to the Authlete API to evaluate parameters in the request and get a token response back to the client.
Once again, let’s simulate this step using Authlete’s /auth/token API to evaluate the request and create the response.
Execute the following curl command (step #15), again making sure to replace <Service ID>, <Service Access Token>, <Client ID>, <Client Secret> and <Code> by your own values generated in the previous step.
curl -s -X POST https://us.authlete.com/api/<Service ID e.g. 10738933707579>/auth/token \
-H 'Authorization: Bearer <Service Access Token e.g. Xg6jVpJCvsaXvy2ks8R5WzjdMYlvQqOym3slDX0wNhQ>' \
-H 'Content-Type: application/json' \
-d '{ "clientId": "<Client ID e.g. 12898884596863>", "clientSecret": "<Client Secret e.g. -olDIKD9BihRfB8O1JxobUEKBZ7PIV5Z6oaqxAshmoUtUZgB-wjmmxTYDiDV6vM_Mgl267PeNrRftq8cWplvmg>", "parameters": "grant_type=authorization_code&code=<Code e.g. GrYz5vtk6VaF0jxfnDrB2yvmk4deIrnMkrGT07JdM5U>&redirect_uri=https://client.example.org/cb/example.com" }'
If successful, Authlete will reply with the following response (message #16).
{
   "resultMessage" : "[A050001] The token request (grant_type=authorization_code) was processed successfully.",
   "action" : "OK",
   "clientIdAliasUsed" : false,
   "subject" : "testuser01",
   "resultCode" : "A050001",
   "refreshTokenExpiresAt" : 1730552811449,
   "grantType" : "AUTHORIZATION_CODE",
   "accessToken" : "7FfwOnGjVHwxXhs2Wr67XV1-ZhQaoy3ctKcGkLyKxuY",
   "idToken" : "eyJhbGciOiJIUzI1NiJ9.eyJzdWIiOiJ0ZXN0dXNlcjAxIiwiYXVkIjpbIjEyODk4ODg0NTk2ODYzIl0sImlzcyI6Imh0dHBzOi8vYXV0aGxldGUuY29tIiwiZXhwIjoxNTU5MTA2ODE1LCJpYXQiOjE1NTkwMjA0MTUsIm5vbmNlIjoibi0wUzZfV3pBMk1qIn0.5uSFMTGnubyvtiExHc9l7HT9UsF8a_Qb0STtWzyclBk",
   "responseContent" : "{\"access_token\":\"7FfwOnGjVHwxXhs2Wr67XV1-ZhQaoy3ctKcGkLyKxuY\",\"refresh_token\":\"T1h7fJ6k55CyipDtXNPbzN8ta3FgAAf4QKjo36OVfIE\",\"scope\":\"openid\",\"id_token\":\"eyJhbGciOiJIUzI1NiJ9.eyJzdWIiOiJ0ZXN0dXNlcjAxIiwiYXVkIjpbIjEyODk4ODg0NTk2ODYzIl0sImlzcyI6Imh0dHBzOi8vYXV0aGxldGUuY29tIiwiZXhwIjoxNTU5MTA2ODE1LCJpYXQiOjE1NTkwMjA0MTUsIm5vbmNlIjoibi0wUzZfV3pBMk1qIn0.5uSFMTGnubyvtiExHc9l7HT9UsF8a_Qb0STtWzyclBk\",\"token_type\":\"Bearer\",\"expires_in\":86400}",
   "scopes" : [
      "openid"
   ],
   "accessTokenDuration" : 86400,
   "type" : "tokenResponse",
   "refreshToken" : "T1h7fJ6k55CyipDtXNPbzN8ta3FgAAf4QKjo36OVfIE",
   "accessTokenExpiresAt" : 1730552811449,
   "refreshTokenDuration" : 864000,
   "clientId" : 12898884596863
}
Pay attention to three key/value pairs in the response; resultMessage, action and responseContent.
resultMessage provides human-readable result of the request processing. (See also Interpreting Authlete’s result codes)action indicates what the authorization server should do next. The value in this response is OK, which means the authorization server should make a token response back to the client.responseContent is supposed to be content of the response from the authorization server.The authorization server would then pass the following response to the client (message #17).
HTTP/1.1 200 OK
Content-Type: application/json

{
 "access_token":"7FfwOnGjVHwxXhs2Wr67XV1-ZhQaoy3ctKcGkLyKxuY",
 "refresh_token":"T1h7fJ6k55CyipDtXNPbzN8ta3FgAAf4QKjo36OVfIE",
 "scope":"openid",
 "id_token":"eyJhbGciOiJIUzI1NiJ9.eyJzdWIiOiJ0ZXN0dXNlcjAxIiwiYXVkIjpbIjEyODk4ODg0NTk2ODYzIl0sImlzcyI6Imh0dHBzOi8vYXV0aGxldGUuY29tIiwiZXhwIjoxNTU5MTA2ODE1LCJpYXQiOjE1NTkwMjA0MTUsIm5vbmNlIjoibi0wUzZfV3pBMk1qIn0.5uSFMTGnubyvtiExHc9l7HT9UsF8a_Qb0STtWzyclBk",
 "token_type":"Bearer",
 "expires_in":86400
}
The client now has the tokens which have been generated by the Authlete API and passed back through the authorization server.
The most common next step is for the client to decode the value of id_token in the response and verify it.
To perform this function, we’re going to decode the token with the free open source tool Online JWT Verfier.
Open the link above, and paste the value of the id_token into the text area in (Step 1) Set JWT (JSON Web Token) to verify on the JWT Verifier UI. In this tutorial, the value is: eyJhbGciOiJIUzI1NiJ9.eyJzdWIiOiJ0ZXN0dXNlcjAxIiwiYXVkIjpbIjEyODk4ODg0NTk2ODYzIl0sImlzcyI6Imh0dHBzOi8vYXV0aGxldGUuY29tIiwiZXhwIjoxNTU5MTA2ODE1LCJpYXQiOjE1NTkwMjA0MTUsIm5vbmNlIjoibi0wUzZfV3pBMk1qIn0.5uSFMTGnubyvtiExHc9l7HT9UsF8a_Qb0STtWzyclBk
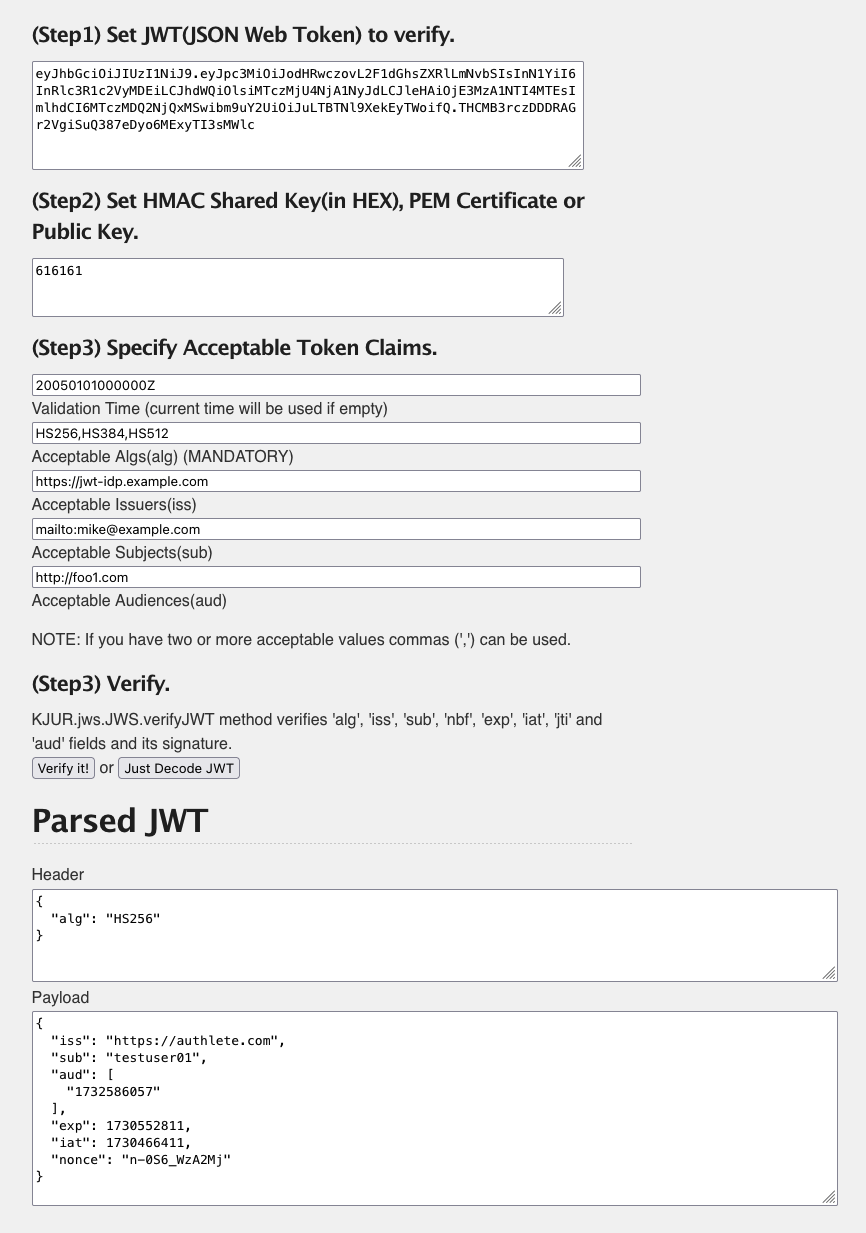
Click the Just Decode JWT button in (Step 3) Verify and see decoded content in the Parsed JWT section.

The decoded results are as follows.
Header:
{
  "alg": "HS256"
}
Payload:
{
  "sub": "testuser01",
  "aud": [
    "12898884596863"
  ],
  "iss": "https://authlete.com",
  "exp": 1730552811,
  "iat": 1730552811,
  "nonce": "n-0S6_WzA2Mj"
}
Note above there are a couple of items that need to be corrected.
iss is https://authlete.com, which is the default value of Authlete. It must be https://as.example.com, that is the identifier of the authorization server in this tutorial.sub is the only attribute related to the user’s identity. It may be better to include other user attributes for the client’s convenience.Let’s fix the iss value and add other claims in the next section.
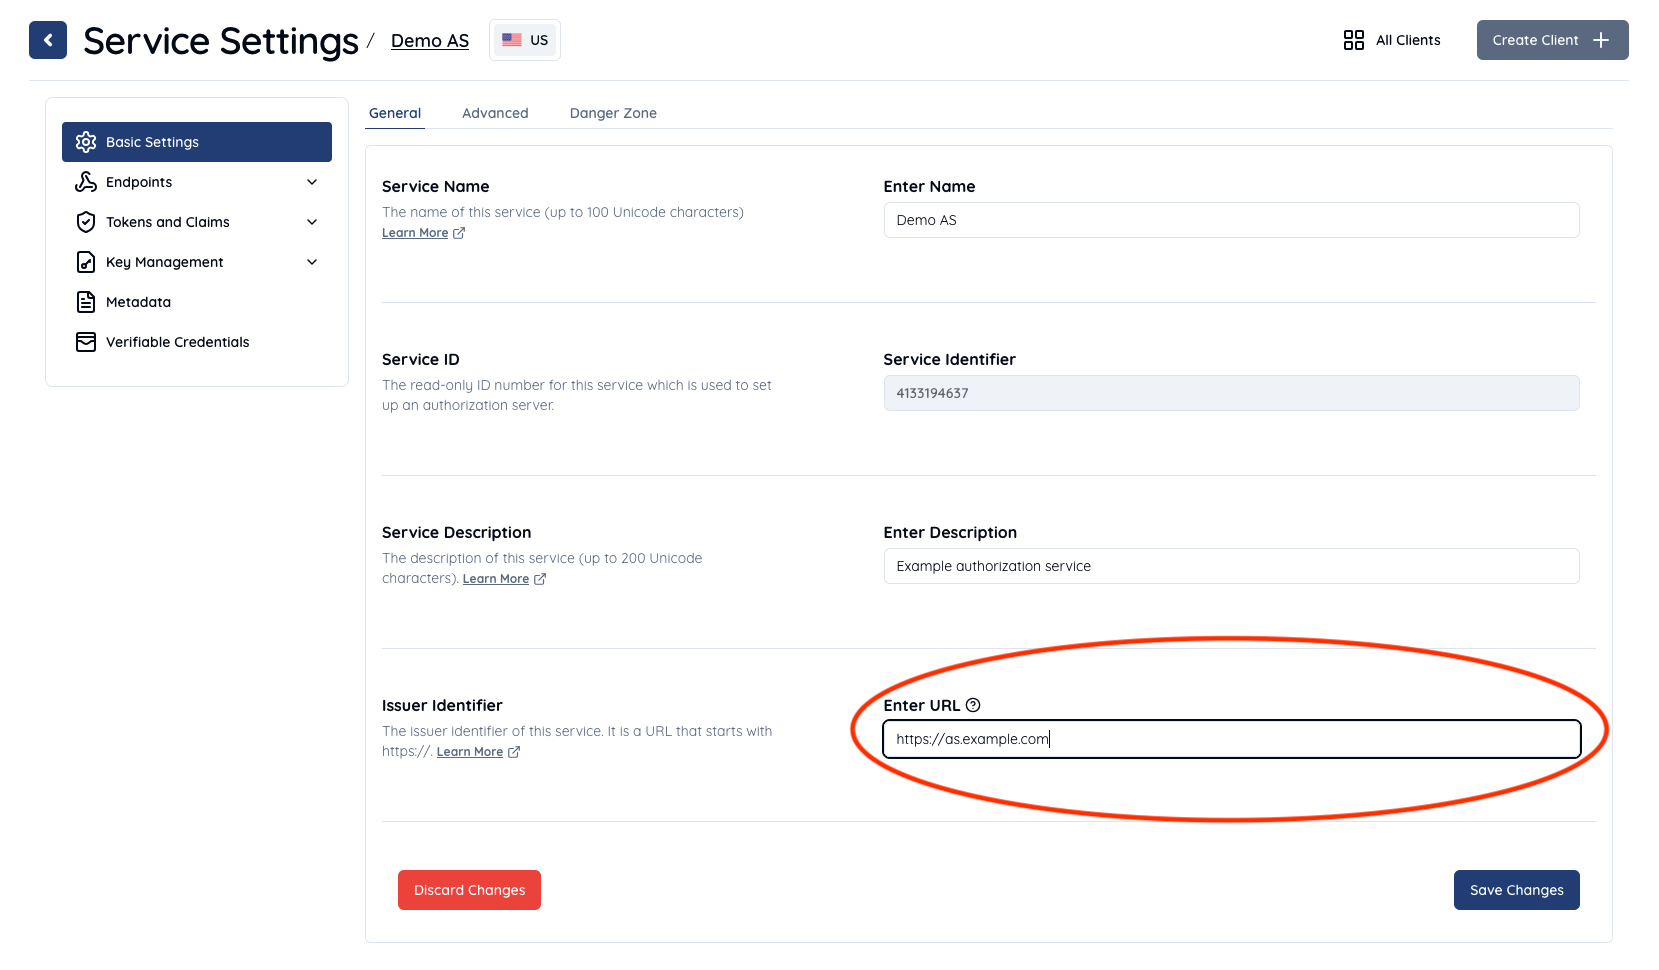
Login to the Management Console https://console.authlete.com and select the Demo AS service previously created during this tutorial. Click the Service Settings button to access the Service Settings.

Note that the default value of Issuer Identifier on the General tab is https://authlete.com. Change it to https://as.example.com and click the Save Changes button in the bottom of the page.

Now that the Token Issuer Identifier iss has been fixed.
Let’s make the same authorization request as the previous one (using the same nonce value for convenience) to Authlete’s /auth/authorization API (step #5).
Make sure to replace <Service ID>, <Service Access Token> and <Client ID> by your own values generated in the previous step.
curl -s -X POST https://us.authlete.com/api/<Service ID e.g. 10738933707579>/auth/authorization \
-H 'Authorization: Bearer <Service Access Token e.g. Xg6jVpJCvsaXvy2ks8R5WzjdMYlvQqOym3slDX0wNhQ>' \
-H 'Content-Type: application/json' \
-d '{ "parameters": "redirect_uri=https://client.example.org/cb/example.com&response_type=code&client_id=<Client ID e.g. 12898884596863>&scope=openid&nonce=n-0S6_WzA2Mj" }'
You should receive the following response (shortened for brevity).
{
   [...]
   "action" : "INTERACTION",
   "resultCode" : "A004001",
   "resultMessage" : "[A004001] Authlete has successfully issued a ticket to the service (API Key = 10738933707579) for the authorization request from the client (ID = 12898884596863). [response_type=code, openid=true]",
   "ticket" : "JjQ_Th1UvZyU5MsdKTLIfLv3VlKwEiYnnULmW6l_d9A",
}
Let’s make a request to Authlete’s /auth/authorization/issue for issuance of an authorization code. Make sure to replace <Service ID>, <Service Access Token> and <Ticket> by your own values generated in the previous step.
This time the following additional claims are included on making the request to the API.
| Item | Value |
|---|---|
name |
Test User |
email |
testuser01@example.com |
email_verified |
true |
You can use the claims parameter to add claims. The request will be constructed as follows.
curl -s -X POST https://us.authlete.com/api/<Service ID e.g. 10738933707579>/auth/authorization/issue \
-H 'Authorization: Bearer <Service Access Token e.g. Xg6jVpJCvsaXvy2ks8R5WzjdMYlvQqOym3slDX0wNhQ>' \
-H 'Content-Type: application/json' \
-d '{ "ticket": "<Ticket e.g. JjQ_Th1UvZyU5MsdKTLIfLv3VlKwEiYnnULmW6l_d9A>", "subject": "testuser01", "claims": "{\"name\": \"Test User\", \"email\": \"testuser01@example.com\", \"email_verified\": true}" }'
Then you will receive the following response.
{
   "responseContent" : "https://client.example.org/cb/example.com?code=ILePyGjraVgeU_fzaQRfd0gv10pzxgcpHY_vHT2dsPI",
   "accessTokenDuration" : 0,
   "authorizationCode" : "ILePyGjraVgeU_fzaQRfd0gv10pzxgcpHY_vHT2dsPI",
   "accessTokenExpiresAt" : 0,
   "type" : "authorizationIssueResponse",
   "resultMessage" : "[A040001] The authorization request was processed successfully.",
   "resultCode" : "A040001",
   "action" : "LOCATION"
}
We assume the authorization server makes a redirection response to the user agent, and then the user agent makes the following HTTP GET request to the client.
GET /cb/example.com?code=ILePyGjraVgeU_fzaQRfd0gv10pzxgcpHY_vHT2dsPI HTTP/1.1
Host: client.example.org
The client makes a token request (new lines for readability) to the authorization server.
POST /token HTTP/1.1
Host: as.example.com
Authorization: Basic base64(12898884596863:-olDIKD9BihRfB8O1JxobUEKBZ7PIV5Z6oaqxAshmoUtUZgB-wjmmxTYDiDV6vM_Mgl267PeNrRftq8cWplvmg)
Content-Type: application/x-www-form-urlencoded

grant_type=authorization_code
 &code=ILePyGjraVgeU_fzaQRfd0gv10pzxgcpHY_vHT2dsPI
 &redirect_uri=https://client.example.org/cb/example.com
The authorization server is supposed to make a request to Authlete’s /auth/token API.
curl -s -X POST https://us.authlete.com/api/<Service ID e.g. 10738933707579>/auth/token \
-H 'Authorization: Bearer <Service Access Token e.g. Xg6jVpJCvsaXvy2ks8R5WzjdMYlvQqOym3slDX0wNhQ>' \
-H 'Content-Type: application/json' \
-d '{ "clientId": "<Client ID e.g. 12898884596863>", "clientSecret": "<Client Secret e.g. -olDIKD9BihRfB8O1JxobUEKBZ7PIV5Z6oaqxAshmoUtUZgB-wjmmxTYDiDV6vM_Mgl267PeNrRftq8cWplvmg>", "parameters": "grant_type=authorization_code&code=<Code e.g. ILePyGjraVgeU_fzaQRfd0gv10pzxgcpHY_vHT2dsPI>&redirect_uri=https://client.example.org/cb/example.com" }'
Authlete returns the following response.
{
   "grantType" : "AUTHORIZATION_CODE",
   "responseContent" : "{\"access_token\":\"R4sd3s02Y1Gj72iI5Md6ZkGapXZ6mSnIEdihTvrM_Ro\",\"refresh_token\":\"k4WqWw2tcDOHxXXo29NxOCwQJyeDOtZ6aw_Y9Ugy-6U\",\"scope\":\"openid\",\"id_token\":\"eyJhbGciOiJIUzI1NiJ9.eyJuYW1lIjoiVGVzdCBVc2VyIiwiZW1haWwiOiJ0ZXN0dXNlcjAxQGV4YW1wbGUuY29tIiwiZW1haWxfdmVyaWZpZWQiOnRydWUsImlzcyI6Imh0dHBzOi8vYXMuZXhhbXBsZS5jb20iLCJzdWIiOiJ0ZXN0dXNlcjAxIiwiYXVkIjpbIjEyODk4ODg0NTk2ODYzIl0sImV4cCI6MTU1OTEzNzMwMSwiaWF0IjoxNTU5MDUwOTAxLCJub25jZSI6Im4tMFM2X1d6QTJNaiJ9.8ngbBoGLUvHXIO4VyGN0-txJfE5Yq86xElMSxqGlLv0\",\"token_type\":\"Bearer\",\"expires_in\":86400}",
   "resultMessage" : "[A050001] The token request (grant_type=authorization_code) was processed successfully.",
   "accessTokenExpiresAt" : 1730554257440,
   "accessToken" : "R4sd3s02Y1Gj72iI5Md6ZkGapXZ6mSnIEdihTvrM_Ro",
   "resultCode" : "A050001",
   "scopes" : [
      "openid"
   ],
   "refreshTokenExpiresAt" : 1730554257440,
   "subject" : "testuser01",
   "action" : "OK",
   "refreshTokenDuration" : 864000,
   "accessTokenDuration" : 86400,
   "refreshToken" : "k4WqWw2tcDOHxXXo29NxOCwQJyeDOtZ6aw_Y9Ugy-6U",
   "clientIdAliasUsed" : false,
   "idToken" : "eyJhbGciOiJIUzI1NiJ9.eyJuYW1lIjoiVGVzdCBVc2VyIiwiZW1haWwiOiJ0ZXN0dXNlcjAxQGV4YW1wbGUuY29tIiwiZW1haWxfdmVyaWZpZWQiOnRydWUsImlzcyI6Imh0dHBzOi8vYXMuZXhhbXBsZS5jb20iLCJzdWIiOiJ0ZXN0dXNlcjAxIiwiYXVkIjpbIjEyODk4ODg0NTk2ODYzIl0sImV4cCI6MTU1OTEzNzMwMSwiaWF0IjoxNTU5MDUwOTAxLCJub25jZSI6Im4tMFM2X1d6QTJNaiJ9.8ngbBoGLUvHXIO4VyGN0-txJfE5Yq86xElMSxqGlLv0",
   "clientId" : 12898884596863
}
The authorization server is expected to return the following response to the client (message #17).
HTTP/1.1 200 OK
Content-Type: application/json

{
 "access_token":"R4sd3s02Y1Gj72iI5Md6ZkGapXZ6mSnIEdihTvrM_Ro",
 "refresh_token":"k4WqWw2tcDOHxXXo29NxOCwQJyeDOtZ6aw_Y9Ugy-6U",
 "scope":"openid",
 "id_token":"eyJhbGciOiJIUzI1NiJ9.eyJuYW1lIjoiVGVzdCBVc2VyIiwiZW1haWwiOiJ0ZXN0dXNlcjAxQGV4YW1wbGUuY29tIiwiZW1haWxfdmVyaWZpZWQiOnRydWUsImlzcyI6Imh0dHBzOi8vYXMuZXhhbXBsZS5jb20iLCJzdWIiOiJ0ZXN0dXNlcjAxIiwiYXVkIjpbIjEyODk4ODg0NTk2ODYzIl0sImV4cCI6MTU1OTEzNzMwMSwiaWF0IjoxNTU5MDUwOTAxLCJub25jZSI6Im4tMFM2X1d6QTJNaiJ9.8ngbBoGLUvHXIO4VyGN0-txJfE5Yq86xElMSxqGlLv0",
 "token_type":"Bearer",
 "expires_in":86400
}
As the client on receiving the response, let’s try to decode the token with Online JWT Verfier again.
Open the link above, and paste the value of the id_token to textarea in Step 1. In this tutorial, the value is:
eyJhbGciOiJIUzI1NiJ9.eyJuYW1lIjoiVGVzdCBVc2VyIiwiZW1haWwiOiJ0ZXN0dXNlcjAxQGV4YW1wbGUuY29tIiwiZW1haWxfdmVyaWZpZWQiOnRydWUsImlzcyI6Imh0dHBzOi8vYXMuZXhhbXBsZS5jb20iLCJzdWIiOiJ0ZXN0dXNlcjAxIiwiYXVkIjpbIjEyODk4ODg0NTk2ODYzIl0sImV4cCI6MTU1OTEzNzMwMSwiaWF0IjoxNTU5MDUwOTAxLCJub25jZSI6Im4tMFM2X1d6QTJNaiJ9.8ngbBoGLUvHXIO4VyGN0-txJfE5Yq86xElMSxqGlLv0
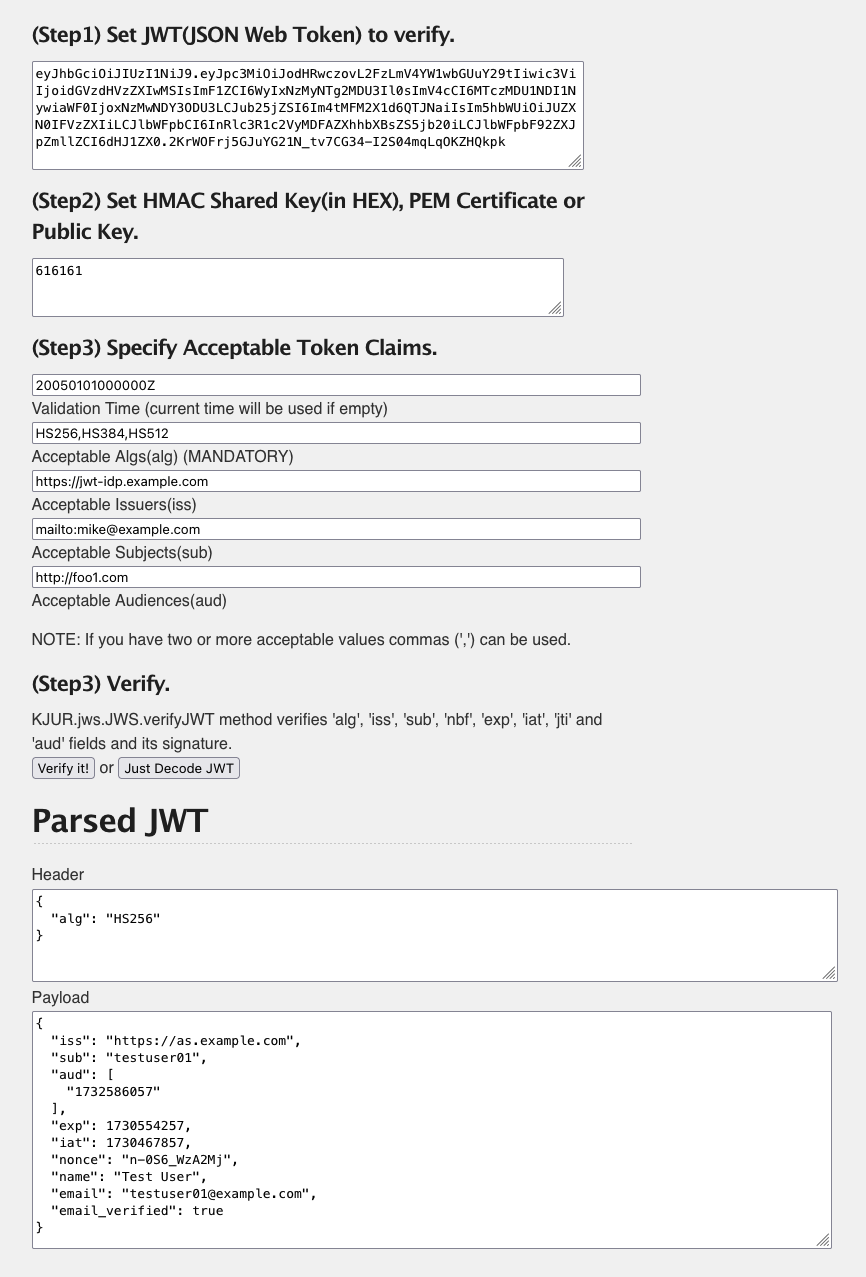
Click the Just Decode JWT button in (Step 3) Verify and see decoded content in the Parsed JWT section.

The decoded results are as follows.
Header:
{
  "alg": "HS256"
}
Payload:
{
  "name": "Test User",
  "email": "testuser01@example.com",
  "email_verified": true,
  "iss": "https://as.example.com",
  "sub": "testuser01",
  "aud": [
    "12898884596863"
  ],
  "exp": 1559137301,
  "iat": 1559050901,
  "nonce": "n-0S6_WzA2Mj"
}
Now we can confirm the correct iss value exists, and find the additional claims, name, email and email_verified are included as expected.
In this tutorial, you were able to simulate an authorization server acting as an OpenID Connect Provider, issuing ID Tokens using the authorization code flow with the Authlete API. You completed the following high level steps.
While this walk through cut out some key pieces in the whole process, hopefully you have a deeper understanding of how an authorization server, hosted in your own infrastructure, would make use of Authlete as a back end service. Implementing such an authorization server on your own may contain complex logic and require detailed attention to potential secure treatment of codes and secrets. By using the Authlete API as a backend your own authorization server implementation is greatly simplified.
Let’s dig deeper on Authlete by playing with the following features.
/auth/authorization/fail API (See Generating error response with “fail” API)/auth/userinfo API (See Access token verification in Userinfo API)